How to Set Up Meta & TikTok Tracking in Webflow (Pixel, CAPI, Events API) with Signal Beam
If you’re running Meta or TikTok ads on a Webflow site, getting accurate conversion tracking is critical.
In this step‑by‑step guide, you’ll learn how to set up Meta Pixel + Conversions API and TikTok Pixel + Events API and connect everything to Webflow using Signal Beam.
We’ll walk through creating your Meta dataset, setting up a TikTok Pixel, and then plugging both platforms into Signal Beam for server‑side tracking in under 30 minutes.
Part 1: Set Up Meta Pixel + Conversions API in Webflow
This is part one of a three‑part onboarding guide for Signal Beam.
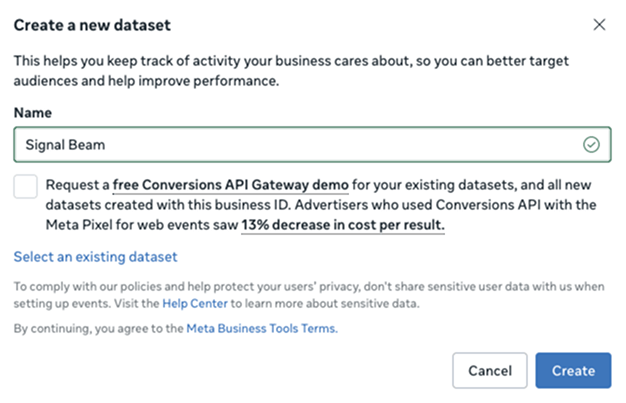
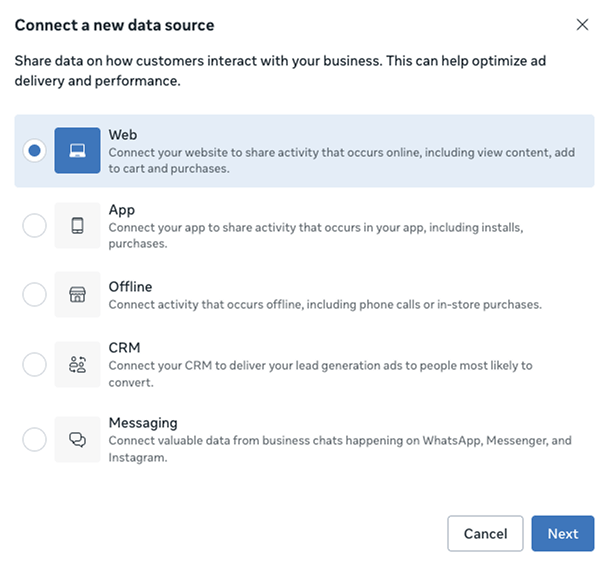
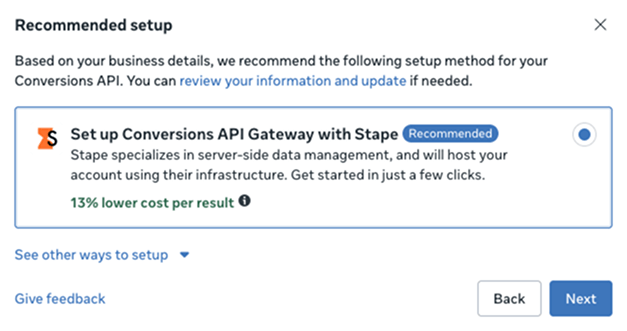
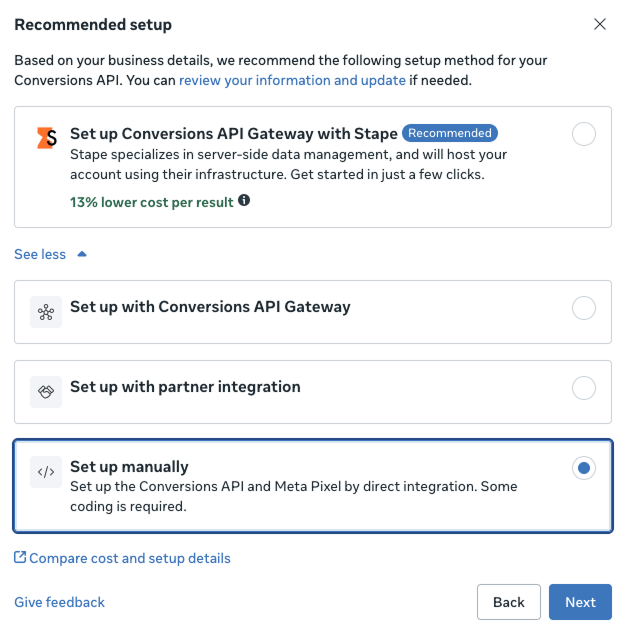
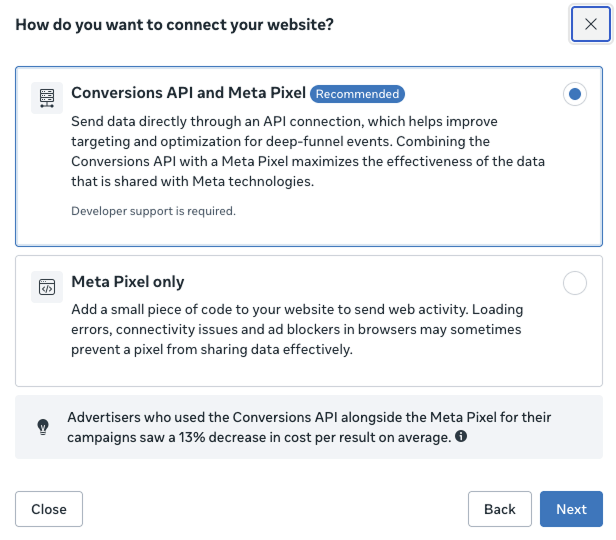
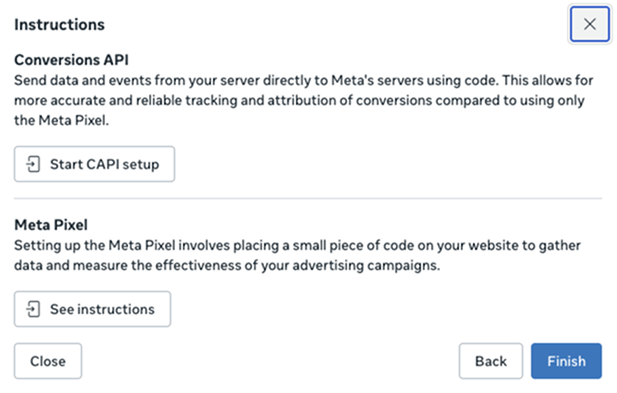
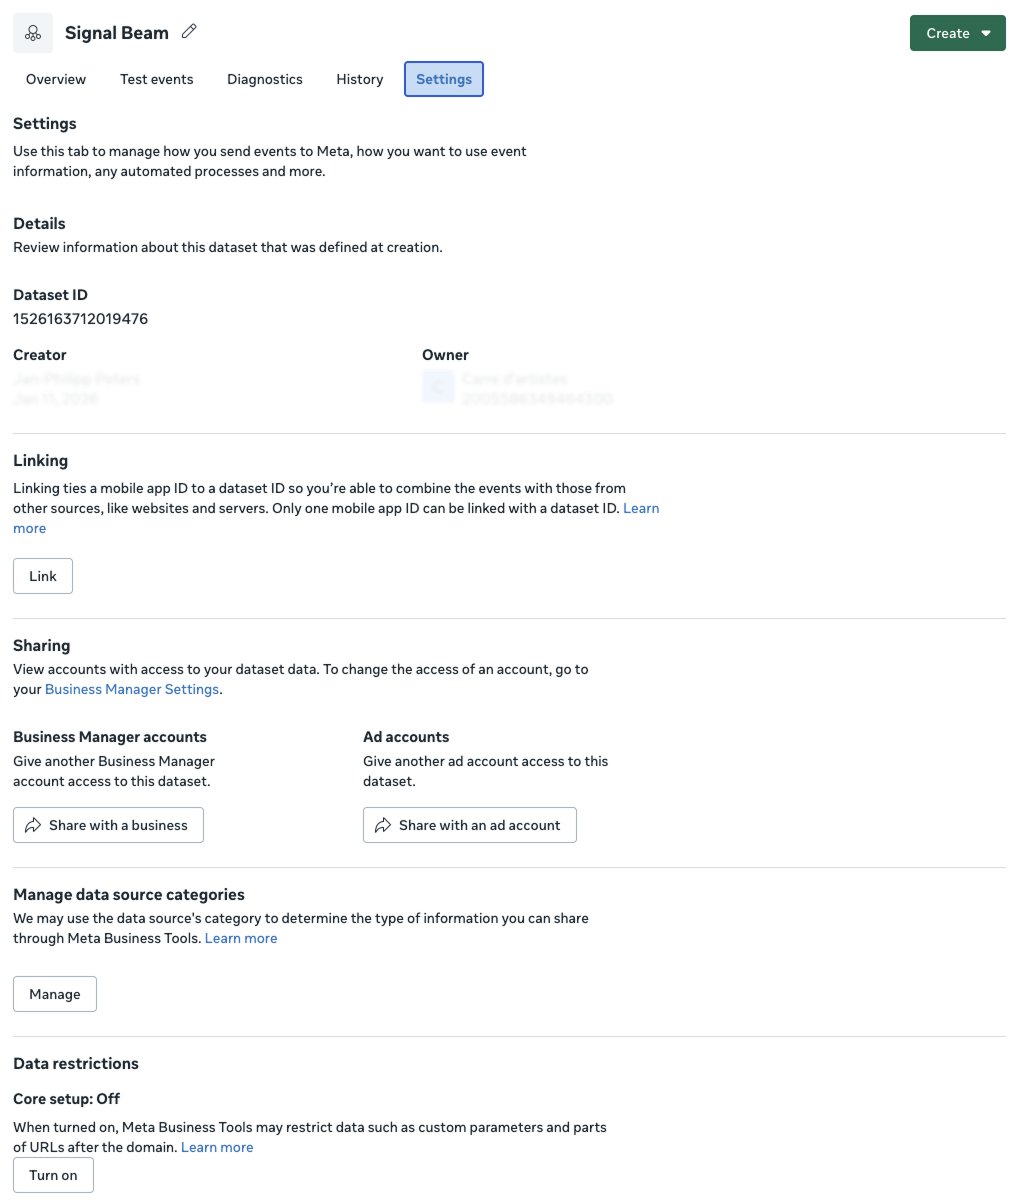
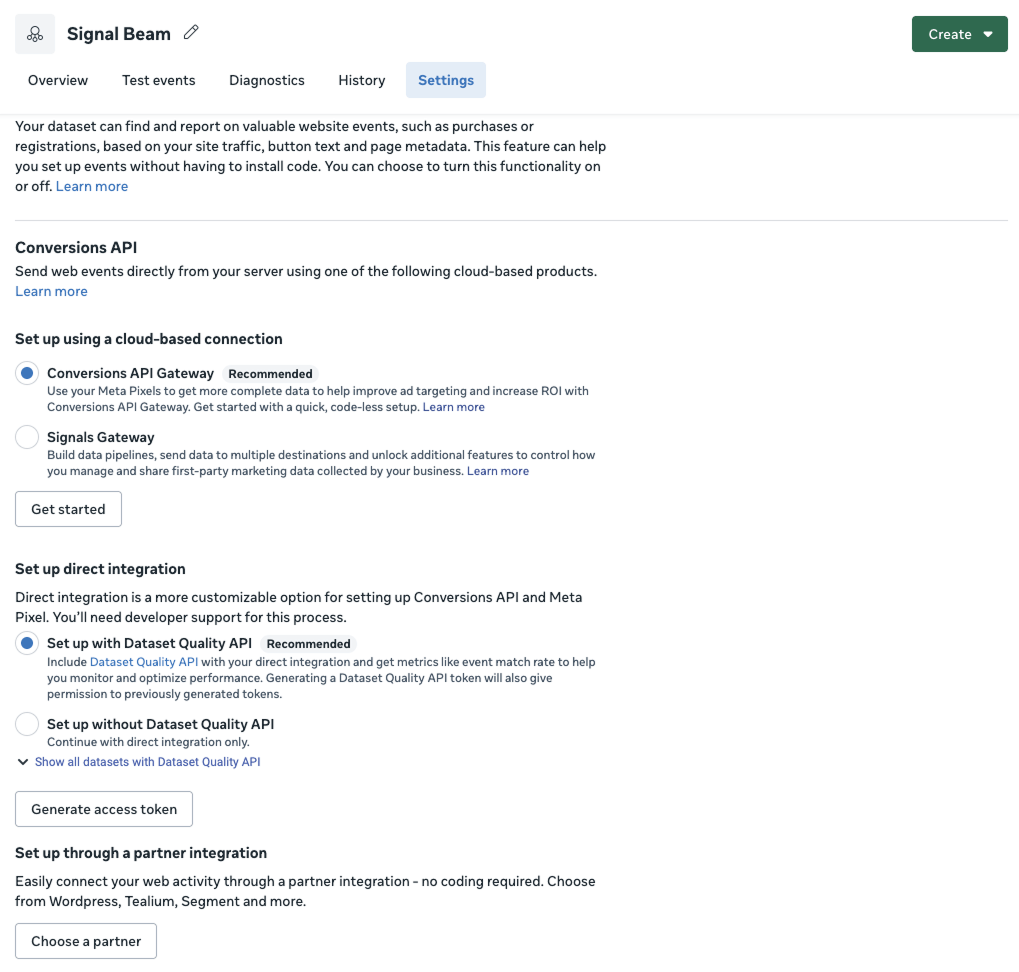
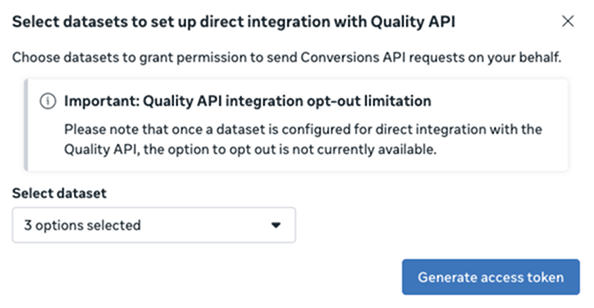
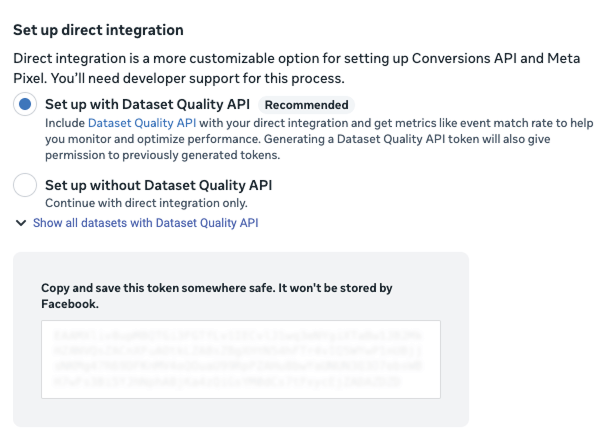
In this first step, you’ll create a Meta dataset (Pixel) and generate a Conversions API access token that Signal Beam will use for server‑side tracking.
When you’re done, you’ll have two things ready to paste into Signal Beam:
Meta Pixel ID (Dataset ID)
Meta Conversions API access token
You’ll connect these to Webflow and Signal Beam in parts two and three of this series.
Why this step matters
Meta now uses datasets that combine browser events (Pixel) and server events (Conversions API) under a single ID. Server‑side events are generally more resilient to ad blockers, iOS privacy changes, and browser issues, and Meta recommends combining Pixel + Conversions API for best performance.
Signal Beam plugs into that same dataset so you can send both browser and server events from your Webflow site without building your own backend.
Prerequisites
Before you start, make sure you:
Have access to Meta Business Manager for the correct business.
Can open Events Manager for that business.
Know which ad account will use this tracking.
If you’re not sure, ask whoever manages your Meta ads to confirm you have the right permissions (ideally Business Admin).
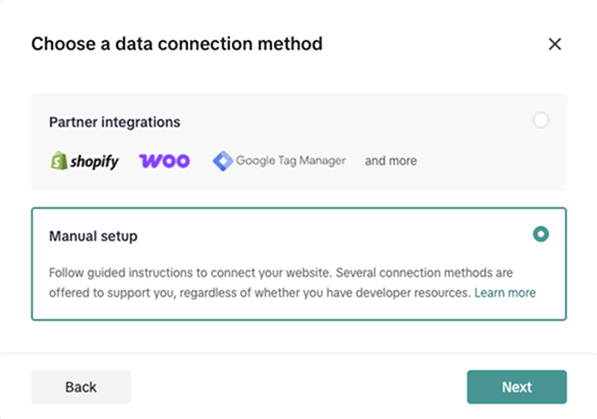
Next TikTok asks which manual connection method you want:
TikTok Pixel + Events API (recommended)
TikTok Pixel (browser only)
Events API (server only)
For best performance and resilience, TikTok explicitly recommends using Pixel + Events API together to maximize captured conversions and protect against browser issues.
On Choose a manual connection method, keep TikTok Pixel + Events API selected (the recommended option).
Click Next.
Click Next
Step 5 – Create your TikTok Pixel
TikTok now opens the Pixel + Events API setup guide.
You’ll see a left‑side checklist:
Create pixel
Install base code
Manage configurations 4–8 … etc.
We only need to touch a few of these steps because Signal Beam handles all the actual tracking logic later.
Now name your pixel
In Create pixel, enter a clear name, for example: “Signal Beam (TikTok)”
Click Create.
Name your pixel and click Create
You’ve now created a TikTok Pixel container which will also be used with the Events API for server‑side events.
Step 6 – Skip the base pixel code (Signal Beam will handle it)
Next screen: Install base code.
Normally, TikTok would ask you to copy this JavaScript and paste it into your site’s <head> so browser events can fire. But with Signal Beam, you don’t need to copy or paste this code manually.
On Install base code, do not copy the code.
Simply click Next.
Click Next
Signal Beam will later add the TikTok Pixel to your Webflow site automatically when you complete the integration.
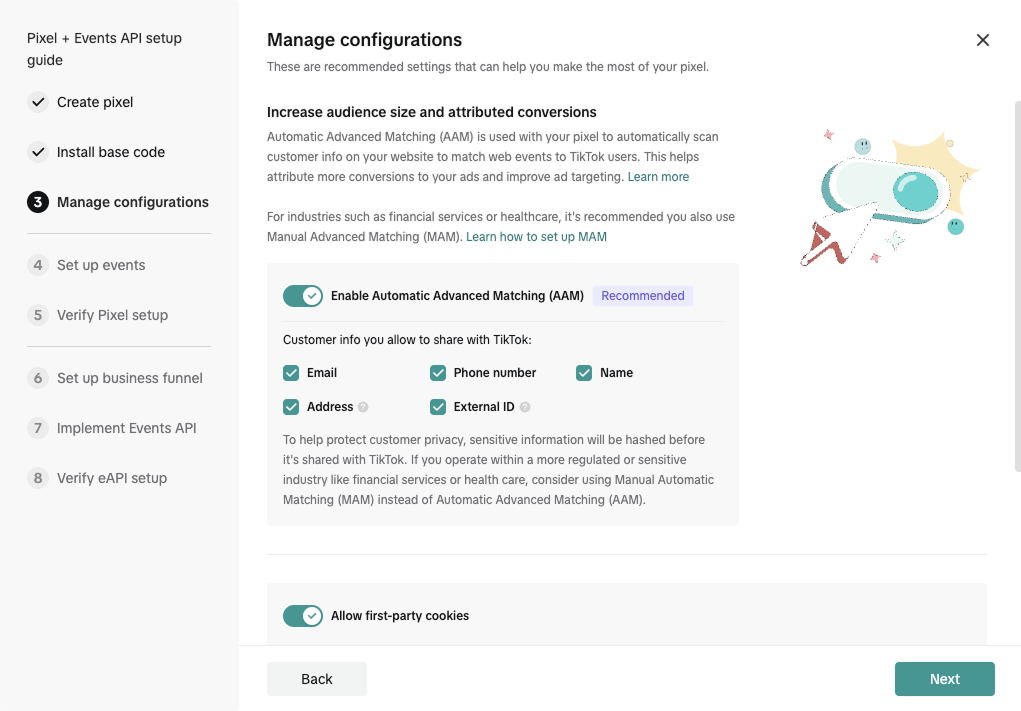
Step 7 – Enable Automatic Advanced Matching
Now you’ll see Manage configurations.
Here TikTok offers Automatic Advanced Matching (AAM), which uses hashed customer information (email, phone, etc.) to improve match rates and attribution – similar to Meta’s Event Match Quality concepts.
Make sure Enable Automatic Advanced Matching (AAM) is turned on.
Leave the default customer info options checked (Email, Phone number, Name, etc.).
Ensure Allow first‑party cookies is also enabled.
Click Next.
Enable AAM and click Next
Signal Beam will already hash user data server‑side before sending it to TikTok, but having AAM on gives TikTok an extra chance to match users from browser data as well.
Step 8 – Skip steps 4, 5, and 6 in the guide
Your setup checklist now moves through:
Set up events
Verify Pixel setup
Set up business funnel
You can safely skip the detailed configuration in these three steps:
Signal Beam will handle event tracking (PageView, AddToCart, etc.) via its own logic and Visual Event Mapper.
You don’t need to manually define or code events inside this TikTok wizard for Signal Beam to work.
For each of steps 4, 5, and 6:
Just click Next to move through them.
Don’t worry if TikTok mentions “add code” or “set events in your site” – that’s what Signal Beam will do later.
(If you ever want to do additional manual events beyond Signal Beam, you can revisit these, but it’s not required.)
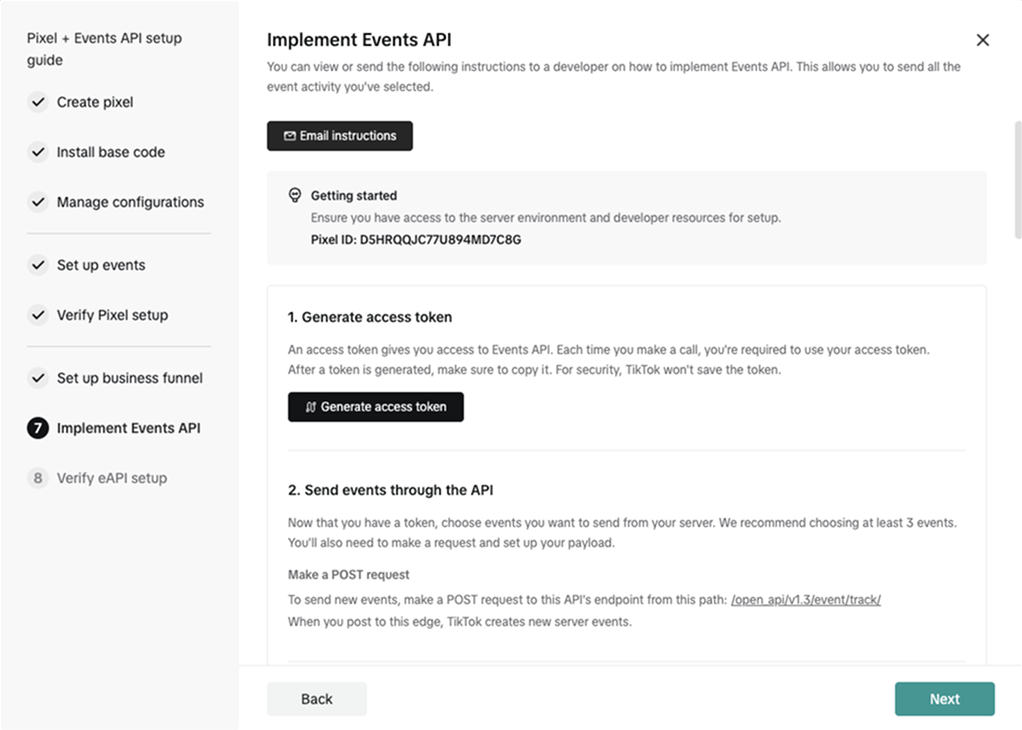
Step 9 – Implement Events API: copy Pixel ID and generate access token
This is the most important step for Signal Beam.
You’re now on 7. Implement Events API.
At the top you’ll see:
A Pixel ID (for example: D5HRQQJC77U894MD7C8G)
Below that, a section titled 1. Generate access token with a Generate access token button.
TikTok’s Events API uses:
The Pixel ID to know which data source you’re sending events to.
The access token to authenticate every Events API call.
9.1 Copy your TikTok Pixel ID
In the Getting started box at the top, find Pixel ID: ….
Copy this Pixel ID and save it somewhere safe – you’ll use it inside Signal Beam.
Copy the Pixel ID
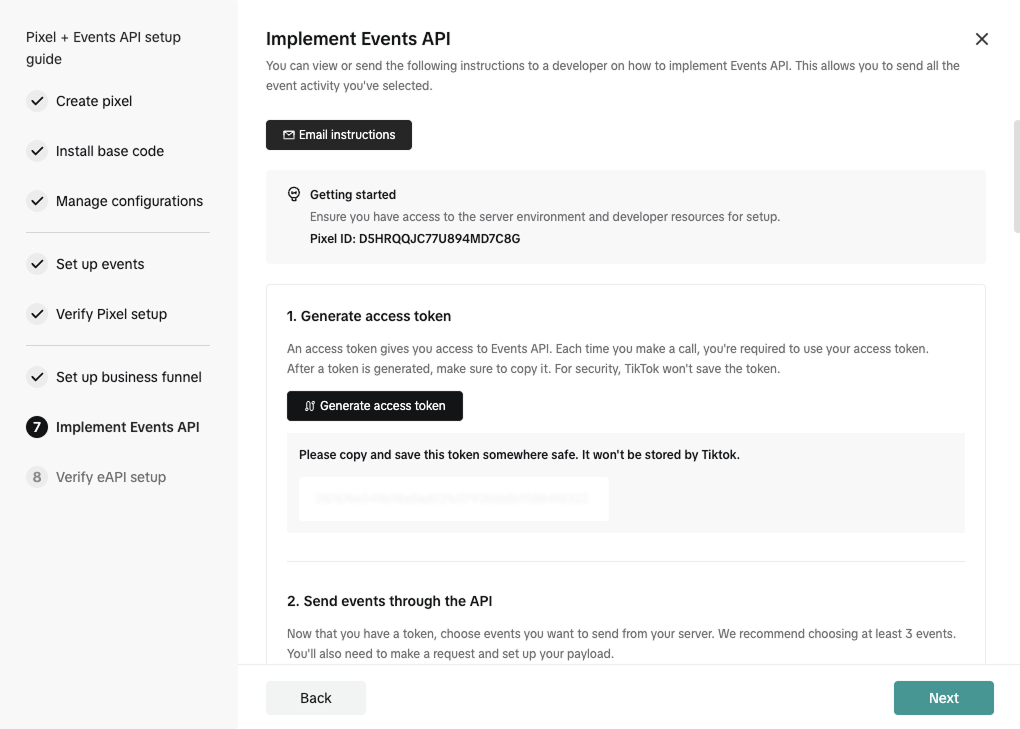
9.2 Generate and copy the Events API access token
In 1. Generate access token, click Generate access token.
TikTok will display a long token string in a box below.
Copy the token immediately – TikTok explicitly notes it will not store or show the token again for security reasons.
Save it in a secure place (for example, your password manager or a secure note).
Copy the access token
You now have the two values Signal Beam needs from TikTok:
TikTok Pixel ID
TikTok Events API access token
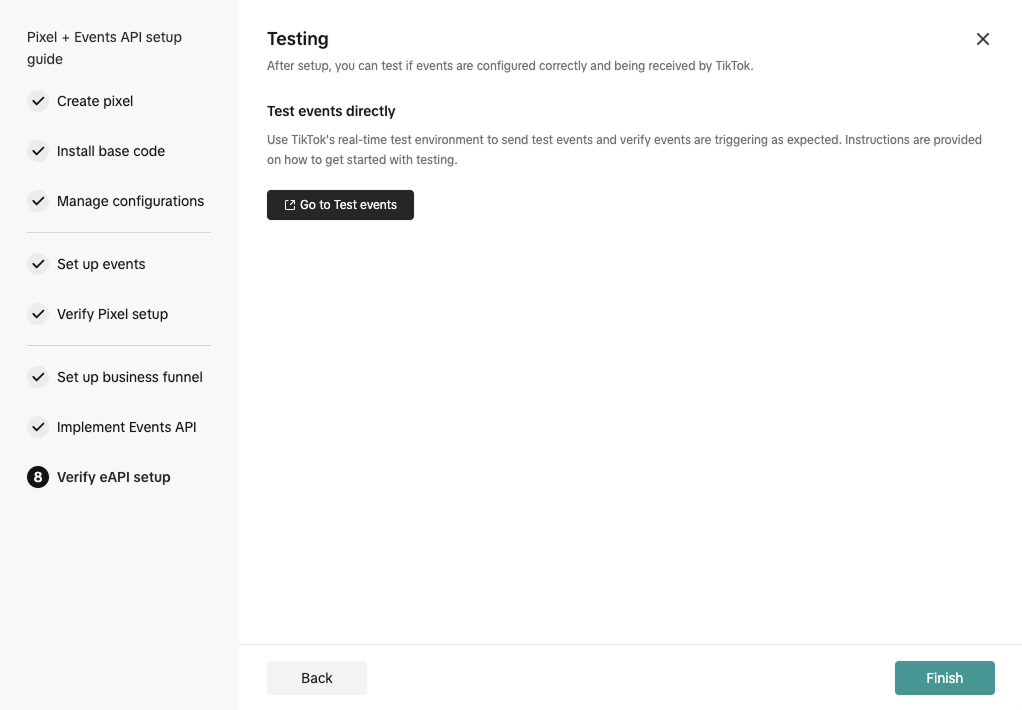
Step 10 – Finish the setup (testing is optional for now)
The last screen in the wizard is 8. Verify eAPI setup / Testing.
TikTok offers a “Go to Test events” button so you can send test traffic and verify events – this is useful after Signal Beam is connected and sending data.
For now:
You don’t need to configure anything here.
Simply click Finish to close the setup guide.
Click Finish
What you should have before moving to Part 3
At this point, your TikTok side is ready. You should now have:
TikTok Pixel ID – from the Implement Events API step.
TikTok Events API access token – generated in the same step and saved securely.
These work together exactly the way TikTok’s documentation describes: the Pixel handles browser events, while the Events API receives server events from integrations like Signal Beam for more reliable, complete tracking.
In Part 3, we’ll:
Plug your Meta Pixel + CAPI (from part one) and
Your TikTok Pixel + Events API (from this guide)
into Signal Beam, then connect everything to your Webflow site so you get full, server‑side tracking without touching any code.
Part 3: Connect Meta & TikTok to Webflow with Signal Beam
In parts one and two, you created:
A Meta dataset (Pixel) + Conversions API access token
A TikTok Pixel + Events API access token
Now we’ll plug both into Signal Beam, connect everything to your Webflow site, and verify that tracking is live.
The whole flow is:
Add your Webflow site in Signal Beam
Connect Meta and TikTok using the IDs and tokens you created
Let Signal Beam automatically install the tracking script in Webflow
Publish your Webflow site
Send a test event and (optionally) verify with pixel helper tools
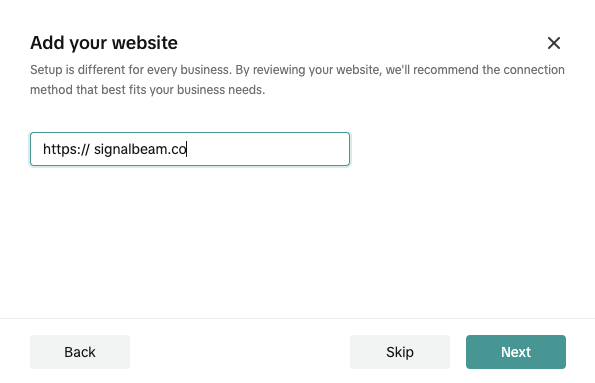
Step 1 – Add your Webflow site in Signal Beam
Log in to your Signal Beam account and go to your dashboard.
Click the button to add a new site (or start the onboarding if this is your first site).
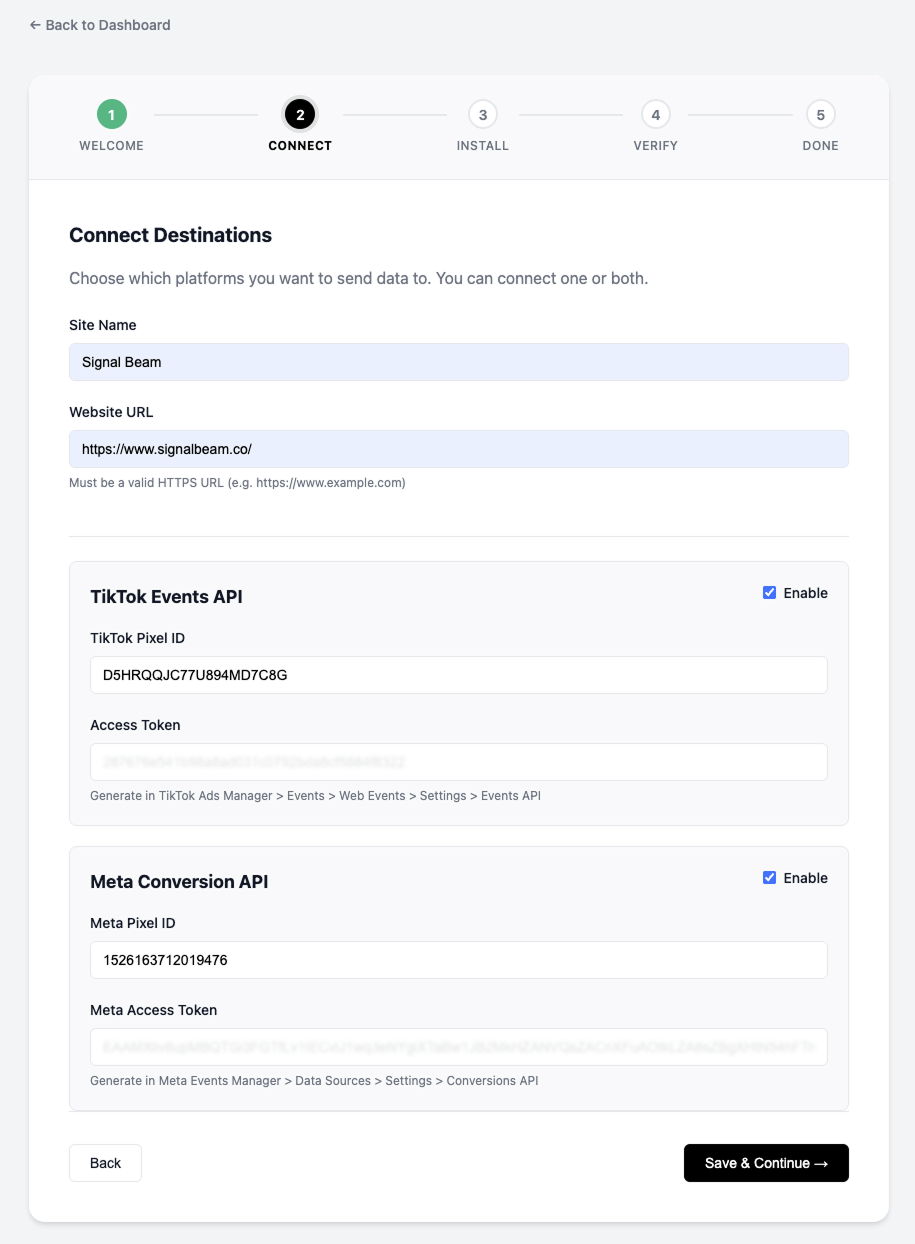
On the “Site Setup” screen, fill in:
Site name – e.g. My Brand Store or Client Name – Main Site
Website URL – paste the live URL of your Webflow site, for example: https://yourdomain.com
The URL must be a valid https:// URL. Signal Beam’s Visual Event Mapper loads your live site inside the app; that only works correctly over HTTPS.
Click Next (or Save & continue, depending on the button label in your UI).
Add your info and click Save & Continue
Step 2 – Enable Meta and TikTok in Signal Beam
On the next screen, you’ll connect your ad platforms.
Enable the platforms you want to track by toggling them on:
Meta
TikTok
For each platform, paste the values you generated in parts one and two.
Double‑check for typos (especially access tokens – they’re long).
Click Save & continue.
Step 3 – Let Signal Beam install the tracking script in Webflow
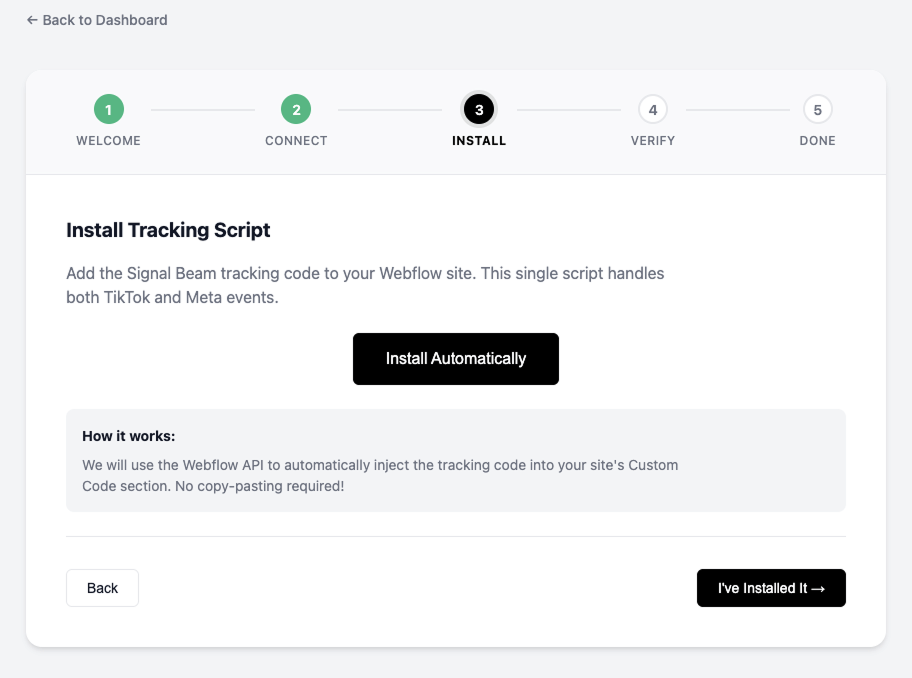
Next, Signal Beam will ask how you want to install the script.
On the Installation step, choose Install automatically.
Confirm any prompts to connect to Webflow / select your Webflow project.
When you choose automatic install, Signal Beam:
Injects the necessary custom code into your Webflow site for you
Handles both the Meta Pixel + CAPI and TikTok Pixel + Events API—no copy‑paste required
Click Install Automatically
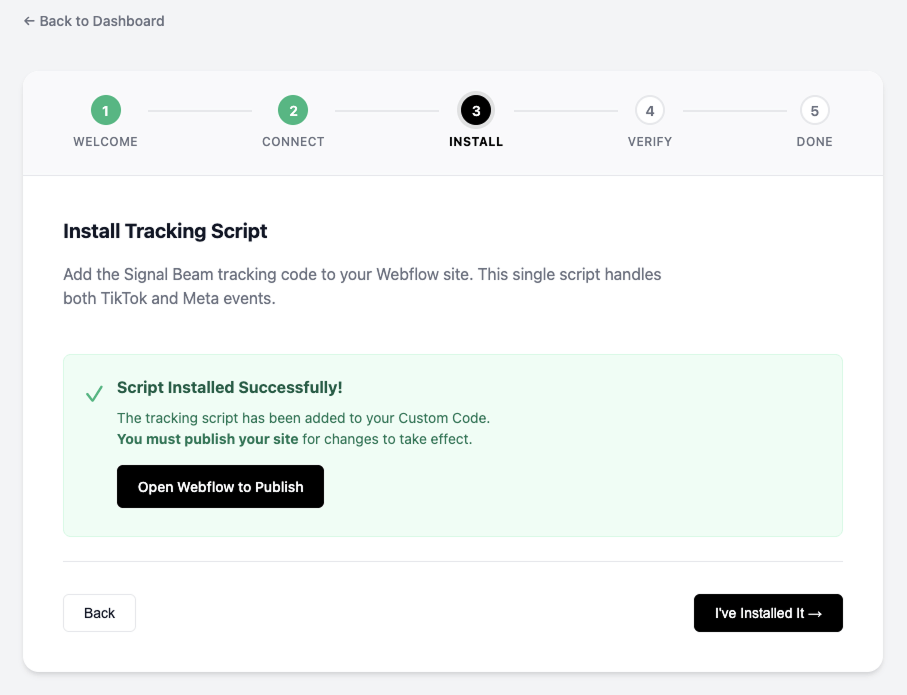
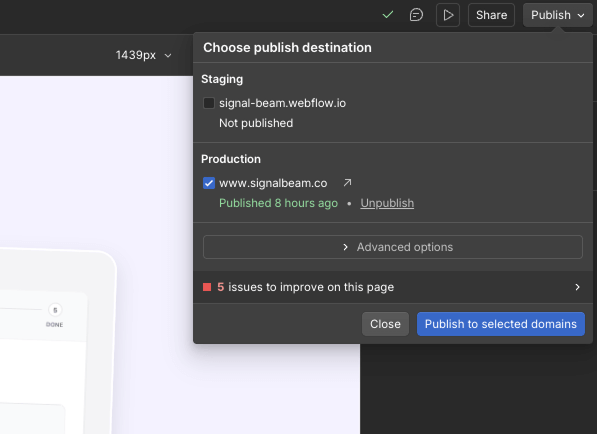
Step 4 – Publish your Webflow site
Signal Beam’s script is now added, but it won’t run until you publish your Webflow site.
In Signal Beam, click Open Webflow to publish.
Webflow will open your project.
In Webflow, click Publish and select:
Your main domain (e.g. yourdomain.com), and optionally
The Webflow staging domain (e.g. yourproject.webflow.io).
After a successful publish, Webflow now serves pages that include Signal Beam’s script.
Return to Signal Beam.
Click I’ve installed it (or the equivalent confirmation button).
Click Open Webflow to Publish
Click Publish to selected domains
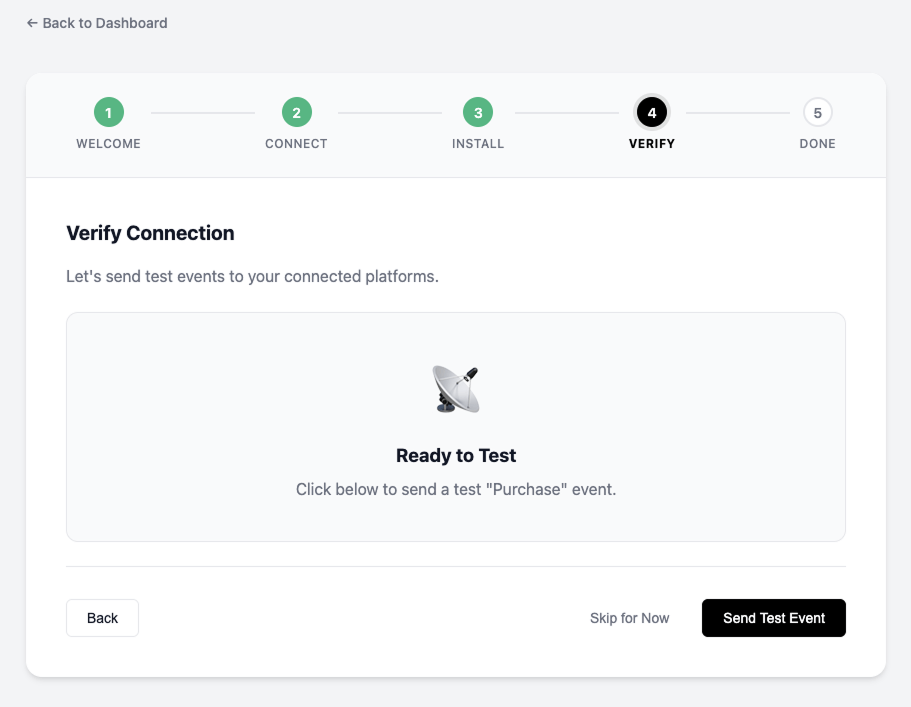
Step 5 – Send a test event from Signal Beam
To confirm everything is wired up correctly, Signal Beam lets you send a test event.
On the Verify connection screen inside Signal Beam, click Send test event.
Signal Beam will trigger a test event that should be received by:
Meta via Pixel + Conversions API
TikTok via Pixel + Events API
Depending on the UI, you’ll typically see a success indicator (check mark / “Connected”) once the event is received.
Click Send Test Event
If the test fails
If Signal Beam reports that the test failed:
Re‑check your IDs and tokens
Is the Meta Pixel/Dataset ID correct?
Did you paste the full Meta access token?
Same questions for the TikTok Pixel ID and Events API token.
Make sure the right site is published
Confirm you published the same domain you entered in Signal Beam.
Clear blockers
Try in an incognito window with ad blockers disabled, just in case a browser extension interferes.
Then click Send test event again.
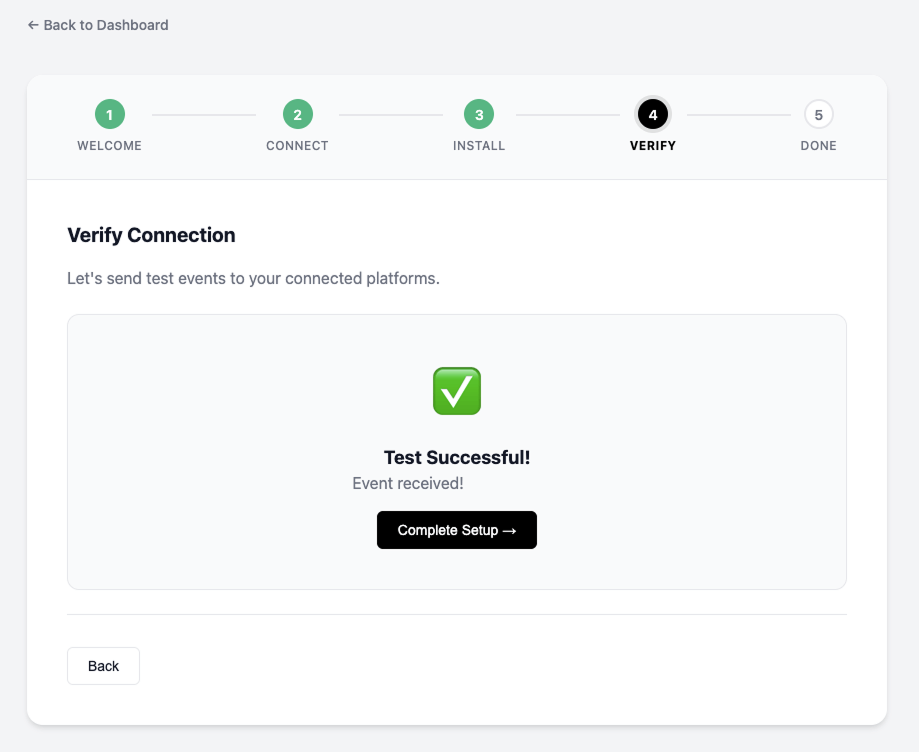
When the test passes, you’re done with the connection step.
Click Complete Setup
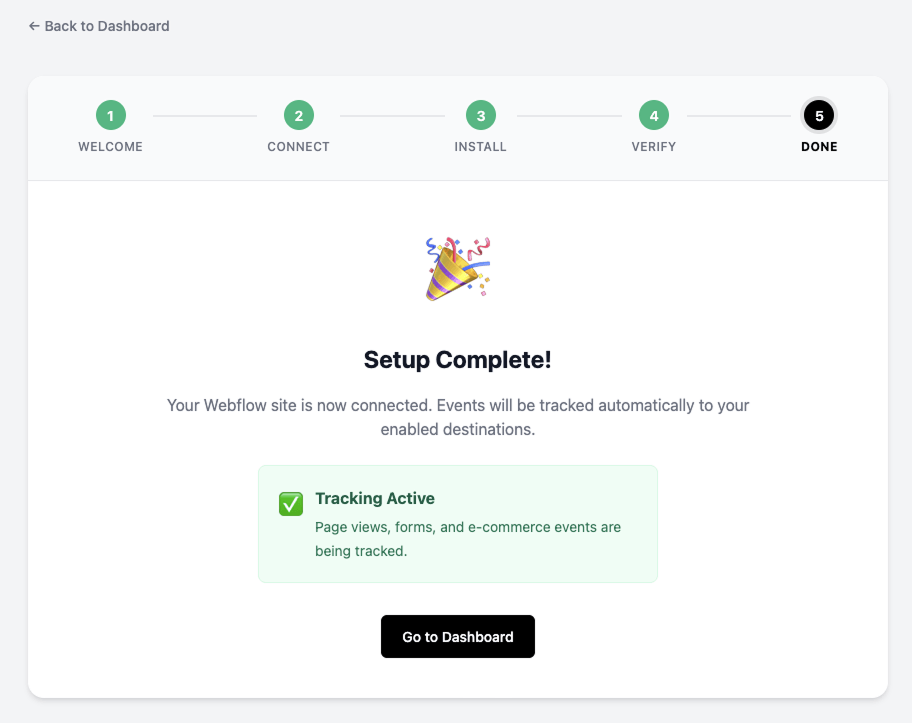
Click Go to Dashboard
Step 6 – Go to the Signal Beam dashboard
Once your test is successful:
Click the button to go to your Signal Beam dashboard.
From there you can:
See real‑time event logs (what’s being sent to Meta & TikTok)Signal Beam website
View Match Quality scores and recommendations
Use the Visual Event Mapper to add custom events without code
This is where you’ll spend time fine‑tuning your tracking after the initial setup.
Optional – Double‑check with Meta & TikTok pixel helpers
If you want an extra layer of reassurance, you can use TikTok’s and Meta’s official browser tools to confirm that the pixels are installed and firing correctly.
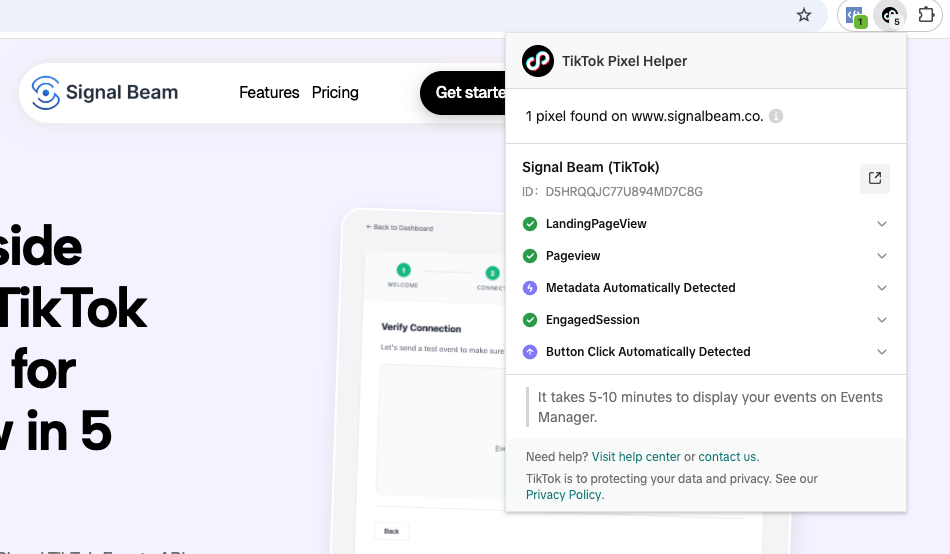
Check TikTok with TikTok Pixel Helper
Install the TikTok Pixel Helper Chrome extension from the Chrome Web Store.chromewebstore.googleads.tiktok
Visit your Webflow site in Chrome.
Click the TikTok Pixel Helper icon – it will show:
Whether a TikTok Pixel is found
The Pixel ID
Which events fired (e.g. PageView, Button Click, etc.)ads.tiktokads.tiktok
TikTok Pixel Helper
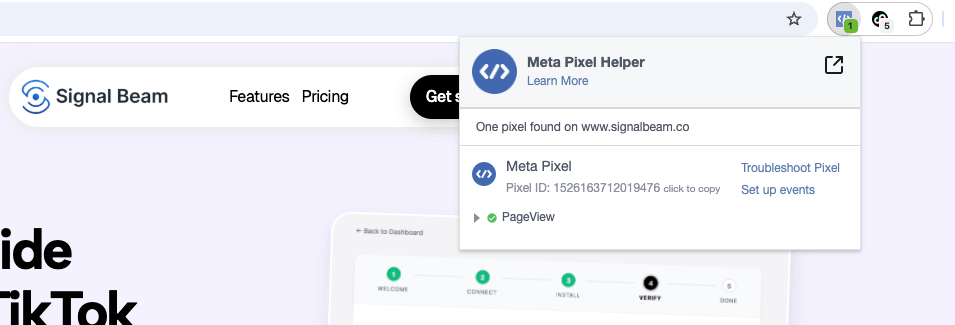
Check Meta with Meta Pixel Helper
Install the Meta Pixel Helper Chrome extension.developers.facebookchromewebstore.google
Visit your site and click the Meta Pixel Helper icon.
It will list:
Detected Pixel IDs
Events like PageView, AddToCart, Purchase
Any warnings/errors that might need attentiondevelopers.facebook
These tools are handy sanity checks whenever you change your Webflow layout or add new tracking.
Meta Pixel Helper
You’re done: Signal Beam + Webflow + Meta + TikTok
At this point you have:
Meta Pixel + Conversions API connected through Signal Beam
TikTok Pixel + Events API connected through Signal Beam
The Signal Beam script installed and live on your Webflow site
A successful test event confirming that data is flowing
From here, you can start using:
The Visual Event Mapper to track key buttons, forms, and CTAs
The Match Quality dashboard to improve attribution
Analytics & logs to debug and understand what’s being sent
Our mission
Empower startups and growing businesses with the tools, insights, and support they need to scale smarter, move faster, and build lasting success.
9
0
1
2
3
0
4
5
0
6
7
8
9
6
+
1
2
3
4
Projects Supported
Helping teams move from idea to execution faster.
8
0
1
2
3
5
4
5
%
1
2
3
4
Client Retention Rate
Long-term partnerships built on real results.
9
0
1
2
3
8
4
5
%
1
2
3
4
Client Satisfaction
Consistently high ratings from clients across industries.
3
0
1
2
3
0
4
5
+
1
2
3
4
Integrations Supported
Seamlessly connects with your favorite tools and platforms.
Trusted by 50+ partners
Meet the team
Our team combines deep industry knowledge with hands-on experience to help startups grow smarter and faster.